1. Introduction
Welcome to the official Flusia CRM documentation.
Flusia CRM is a complete platform for customer relationship management, designed for businesses that need:
What you need
- Modern browser (Chrome, Firefox, Safari, Edge)
- Stable internet connection
- An active Flusia account for your company
2. Initial Setup
Set up Flusia for the way you work.
2.1 Company Settings

Required Information
| Field | Description |
|---|---|
| Business Name | Official company name |
| VAT Number | Company VAT number |
| SDI Code | Recipient code for electronic invoicing |
| Main company email | |
| Phone | Phone number |
| Address | Full registered office address |
Personalization and look
- Horizontal Logo: Logo for documents and headers
- Logo Icon: Small icon for the browser tab and for your phone
- Legal Signature: Signature for official documents
2.2 Users and Roles

User Management
- Click "Add User" (or "Invite" to send an invitation by email)
- Fill in: First name, Last name, Email (used to sign in), Temporary password, Role
- Save to create the account.
You can also Edit, Disable, or Delete (irreversible) existing users.
Roles and Permissions
Roles are fully customizable. For each role, you can decide which modules to make visible and which actions to allow (view, create, edit, delete).
- Go to Settings > Roles
- Click "Add Role" or edit an existing one
- Assign a name to the role (e.g., "Sales", "Admin")
- Select desired permissions for each module
- Save the role

2.3 Client Configuration
In this section you can customize how clients and leads are managed in the CRM, adapting it to your company's needs.
Custom Labels
You can rename menu items to fit your industry. For example, you can call "Clients" as "Companies" or "Leads" as "Prospects" or "Contacts".
New record: person or company
Choose whether new client and lead records start as a Person or as a Company. This makes data entry faster.
Custom Fields
Add extra fields to client and lead records to collect the information your business needs. Available field types:
Custom States
Choose the states a lead or a client can have. Each state has a color, so you can spot it at once in the Kanban view.
- New
- Contacted
- Interested
- Converted
- Active
- Paused
- Lost
2.4 Lead Pipeline
The pipeline is the path a lead follows from first contact to closing (won or lost). Each stage matches a step of your sales process.

How It Works
Flusia already includes a ready-made pipeline (Sales Pipeline, with six stages) that you can change as you like:
- New - Lead just entered, not yet contacted
- Contacted - First contact made (call, email, message)
- Qualified - The lead is interested and has a clear budget and need
- Proposal - Offer sent to the client
- Won - Sale closed successfully
- Lost - Sale lost or client not interested
Customize the Pipeline
- Click on a stage to edit its name and color
- Drag the stages to change their order
- Add new stages with the "+ Aggiungi Stage" button
- You can create multiple pipelines for different sales processes (e.g., "B2B", "E-commerce")
2.5 Services & Catalog
The service catalog allows you to create quotes faster by selecting pre-configured services instead of entering them manually each time.
1. Create Categories
First, organize the catalog by creating categories:
- Go to Settings → Sales → Service Categories
- Click "+ New Category"
- Enter the name (e.g., "Consulting", "Development", "Maintenance")
- Save
2. Create Services
Once categories are created, add services:
- Go to Settings → Sales → Services
- Click "+ New Service"
- Fill in: Name, Category, Base Price, Unit of Measure
- If it's a recurring service, select the frequency (Monthly, Annual, etc.)
- Save
Catalog Example
Consulting
   - Initial analysis: 500 euro
   - Business plan: 1,200 euro
Development
   - Landing page: 800 euro
   - E-commerce: 3,500 euro
2.6 Payment Methods
Configure the payment methods you offer to your clients. These will appear in offers and quotes.
Add a Payment Method
- Go to Settings → Sales → Payment Methods
- Click "+ New Method"
- Select the type (Bank Transfer, Card, PayPal, Cash, Direct Debit)
- Enter required details (e.g., IBAN for bank transfer)
- Save
Installments & Deferred Payments
You can configure installment payment plans to offer flexibility to clients:
- Number of installments: How many installments to offer (e.g., 3, 6, 12)
- Frequency: Monthly, bimonthly, quarterly
- Deposit: Percentage or fixed amount to pay immediately
Available Methods
| Method | When to use it |
|---|---|
| Bank Transfer | The most common between businesses. IBAN and account holder required |
| Credit Card | Immediate online payments |
| PayPal | An alternative for clients abroad |
| Cash | Only for businesses with physical retail locations |
| Direct Debit/SDD | Direct debit for subscriptions and recurring payments |
2.7 Managers and team members
A manager can see the leads and Offers of their team members. Useful for anyone leading a sales team.
Configuration
- Go to Settings → Users
- Edit a user
- In the "Manager" field, choose their direct manager
Role permissions
After setting the managers, give the roles one of these permissions:
- See direct team members: the manager sees only the people who report directly to them
- See the whole chain: the manager also sees the team members of their team members, at every level
Who sees whom
Here is what each person sees in the filters of the Leads and Offers pages:
| Permission | What they see in the filters |
|---|---|
| Can filter by any user | Sees every user in the filter |
| No permission | Sees only themselves |
| See direct team members | Sees themselves and their direct team members |
| See the whole chain | Sees themselves and the whole chain of their team members |
Practical Example
Imagine this structure:
Owner (Anna)
  └── Sales director (Marco)
        ├── Team leader (Mario)
        │     ├── Sales rep (Luca)
        │     └── Sales rep (Sara)
        └── Team leader (Giulia)
└── Sales rep (Paolo)- Marco, with permission to see the whole chain: sees Mario, Giulia, Luca, Sara, Paolo
- Mario, with permission to see direct team members: sees only Luca and Sara
- Luca, without these permissions: sees only himself
Tips
- The "Manager" field is a drop-down list in the user's record, easy to fill in
- These permissions work like all the others: you give them to the role, not to the individual
- The user filter in the Leads and Offers pages automatically shows only the people you can see
2.8 Automatic lead assignment
Flusia can assign new leads to your colleagues by itself, following the rules you choose. You can create several rules: the first one that matches is the one that applies.
1. Assignment Rules
Each rule defines:
- Name: descriptive identifier (e.g., "Leads from Google Ads")
- Conditions: criteria the lead must match
- How to combine the conditions: OR (one is enough) or ALL (all are needed)
- People: who gets the leads that match the rule
2. Possible conditions
Each rule can filter by one or more of these conditions:
- Interests: interest categories selected by the lead
- Pipeline: the pipeline where the lead is placed
- Lead Source: where the lead comes from (e.g., website, campaign, referral)
3. How to combine the conditions
| How to combine | Meaning | Example |
|---|---|---|
| OR | At least one condition must be true | Lead from "Google Ads" or from "Facebook" |
| ALL | All the conditions must be true | Lead with interest "Premium" and pipeline "Enterprise" |
4. How the person is chosen
- Flusia tries the rules in order, from the first to the last
- As soon as a rule matches, the lead goes to a person from that rule. If nobody in the rule is available, Flusia moves on to the next rule
- If no rule matches, the backup list (Fallback) is used
- Among the people on the chosen list, the lead goes to whoever has the fewest, so nobody always gets everything. If it is a tie, Flusia picks one of them at random
Configuration Location
Interface sections:
- Main switch: turns the whole system on or off
- Assignment rules: the list of rules, with up and down arrows to change the order, a switch to turn each rule on or off, and buttons to edit or delete it
- Fallback: the people who get the leads if no rule matches
- Advanced settings: how each person's "workload" is calculated
Practical Example
Rule 1: "Premium Leads" (tried first)
  - How to combine: ALL
  - Conditions: Interest "Premium" + Pipeline "Enterprise Sales"
  - Assign to: Mario, Luigi
  → Matches only if the lead has the Premium interest AND is in the Enterprise pipeline

Rule 2: "Campaign Leads"
  - How to combine: OR
  - Conditions: Source "Google Ads" or "Facebook Ads"
  - Assign to: Anna, Paolo
  → Matches if the lead comes from Google Ads OR from Facebook Ads

Rule 3: "Consulting Leads"
  - How to combine: ALL
  - Conditions: Interest "Consulting"
  - Assign to: Marco
  → Matches if the lead has the Consulting interest

Fallback: all the other colleagues
  → If no rule matches, the lead goes to one of these people
When it runs
Automatic assignment runs in two cases:
1. Leads coming from outside
When a lead arrives from a website form or from an integration with nobody assigned, Flusia assigns it by itself following the rules.
2. Automations: the "Assign user" action
In automations, the "Assign user" action has the "Based on interests" option, which uses the same rules you set in the settings.
Advanced Settings
How workload is calculated
Choose what counts when deciding who has more work:
| Option | What it does |
|---|---|
| Record type | count only Leads, only Offers, only Clients, or everything |
| Pipeline filter | count only the records in certain pipelines |
| Status filter | count only the records in certain states |
3. Integrations
Connect Flusia with your favorite tools.

3.1 WhatsApp

How to Connect WhatsApp
- Open Settings > WhatsApp, Numbers tab, and click Add number
- Choose Connessione rapida (QR code from your phone, ready in 2 minutes, with all the basic features) or WhatsApp Ufficiale (recommended: number verified by Meta, approved message templates for writing first, full European compliance)
- For Quick connection: click Scan QR, then on your phone open WhatsApp > Linked devices > Link a device and scan the code
- For Official WhatsApp: click Start setup and follow the Meta procedure (a Meta Business account is required)
- Wait a few moments: your chats appear in the CRM. You can add more numbers
Available Features
- View and reply to chats
- Send images, documents, and files
- Automatically link chats to clients in the database
- Message history saved in CRM
- Approved message templates and costs for official numbers
- Assigning chats to your colleagues
3.2 Fatture in Cloud
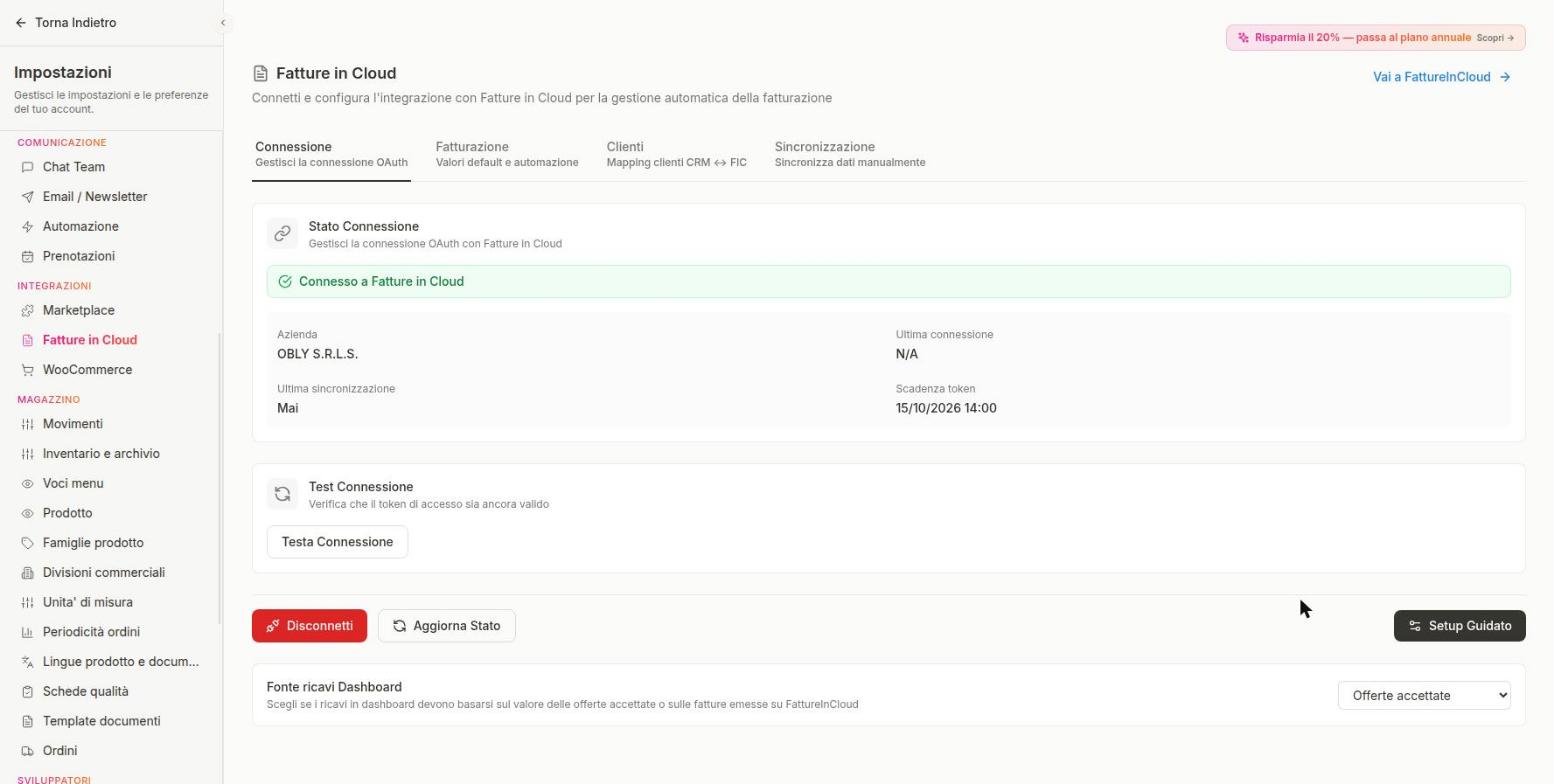
Learn more about this integration →
Integration Features
- Clients in both directions: bring clients from Fatture in Cloud into the CRM, or send CRM clients to Fatture in Cloud
- Invoice creation: you prepare the invoice in Flusia and it is sent to Fatture in Cloud for issuing
- Sending to the Sistema di Interscambio (SDI): invoices go out automatically through Fatture in Cloud
- Automatic numbering: invoice numbers follow the ones set in Fatture in Cloud
- Invoice history: you bring into Flusia the invoices already issued, so everything is in one place
- Invoices and Offers: you link invoices to CRM Offers. Flusia suggests the match from VAT number, tax code and client name
How to Connect Fatture in Cloud
- Go to Settings > Fatture in Cloud
- Click the "Connect to Fatture in Cloud" button
- Sign in with your Fatture in Cloud credentials
- Authorize Flusia to access your data
- You'll be automatically returned to Flusia
- The connection is active!
Client Management
From the "Clienti" tab in the Fatture in Cloud settings you can:
- Import clients: bring clients from Fatture in Cloud into the CRM
- Export clients: send CRM clients to Fatture in Cloud
- Link clients: manually match clients that already exist in both programs
Matching invoices to Offers
From the Fatture in Cloud > Matching page you can link invoices to Offers:
- Flusia suggests the right Offers by itself, looking at client, amount and date
- You can link the invoice to a specific service and its related installment
- Linked invoices let you follow the payments of each Offer
Daily Usage
Once the account is connected:
- Go to Fatture in Cloud from the main menu
- See the invoices already brought into Flusia, with their payment status
- Create new invoices from the Invoice Queue
- Link invoices to Offers from the Matching section
- Refresh the data by hand when needed
Troubleshooting
- Connection error: try disconnecting and reconnecting the account. If the problem persists, contact support.
- Invoice not sent: check in Fatture in Cloud whether there are errors in the Sistema di Interscambio (SDI) checks
- If synchronization does not work, use the Test Connessione button: if the connection has expired, reconnect the account.
3.3 WooCommerce
Ideal if you sell online. It needs the "Flusia Sync" extension on your WordPress site.
- Orders arrive as accepted Offers.
- Keeps the products on your site and the Flusia Warehouse aligned.
- Updates your Clients right away when an order comes in.
3.4 Google Workspace
Sign in with Google to turn on:
3.5 Claude, ChatGPT and AI apps
How to connect an AI app
- In the AI app, open the connectors section (in Claude: Customize → Connectors → Add) and enter the Flusia connection address: https://api.flusia.it/mcp
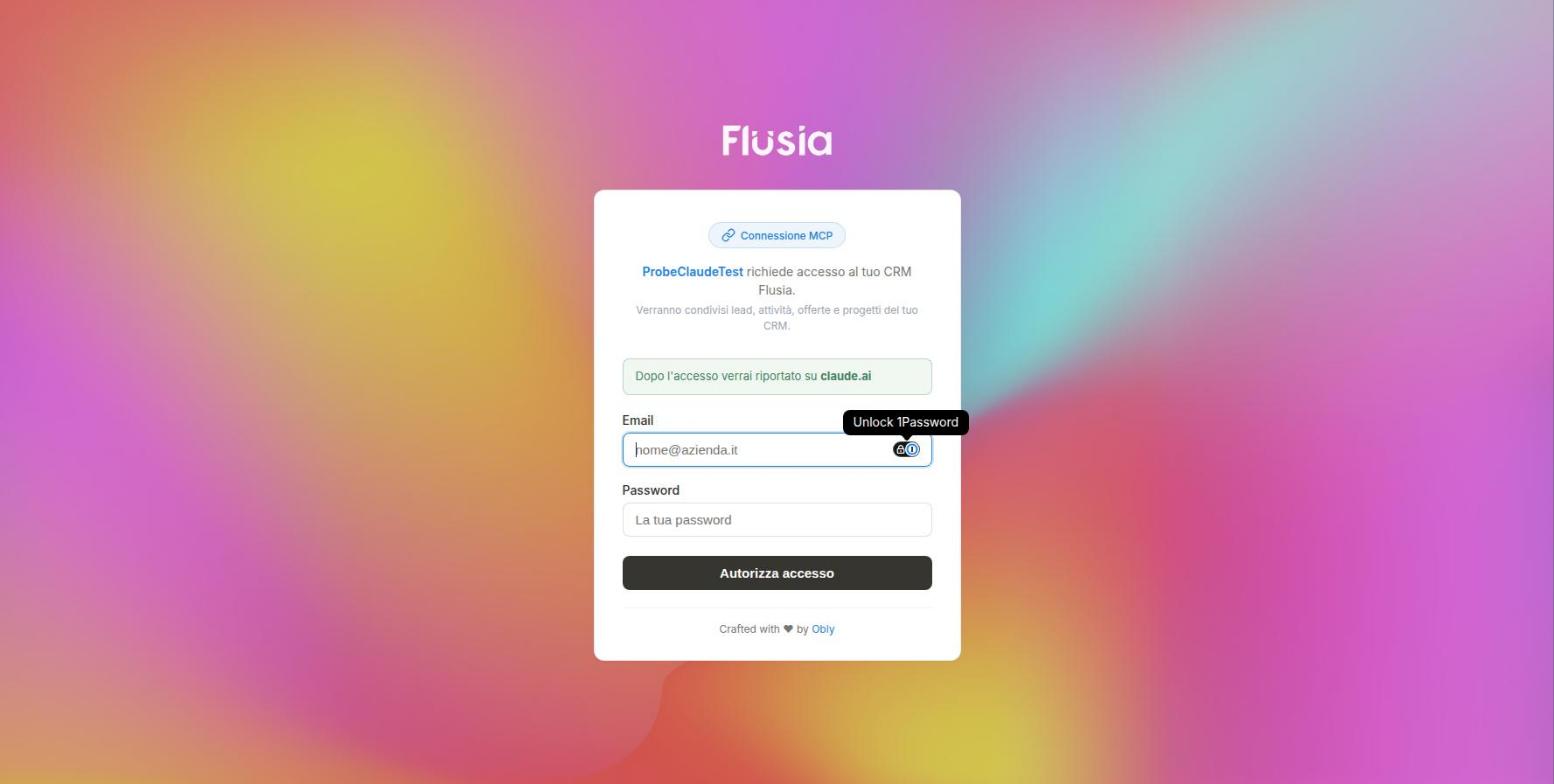
- The first time, the Flusia consent page opens (api.flusia.it): read the app name and the site you will be taken back to after signing in
- Enter the email and password of your Flusia account
- Confirm with the code from your authenticator app or the code received by email: this check is always required, even if you have not turned on two-step verification
- You are sent back to the AI app: from now on it can read and update the CRM on your behalf
What the consent page shows
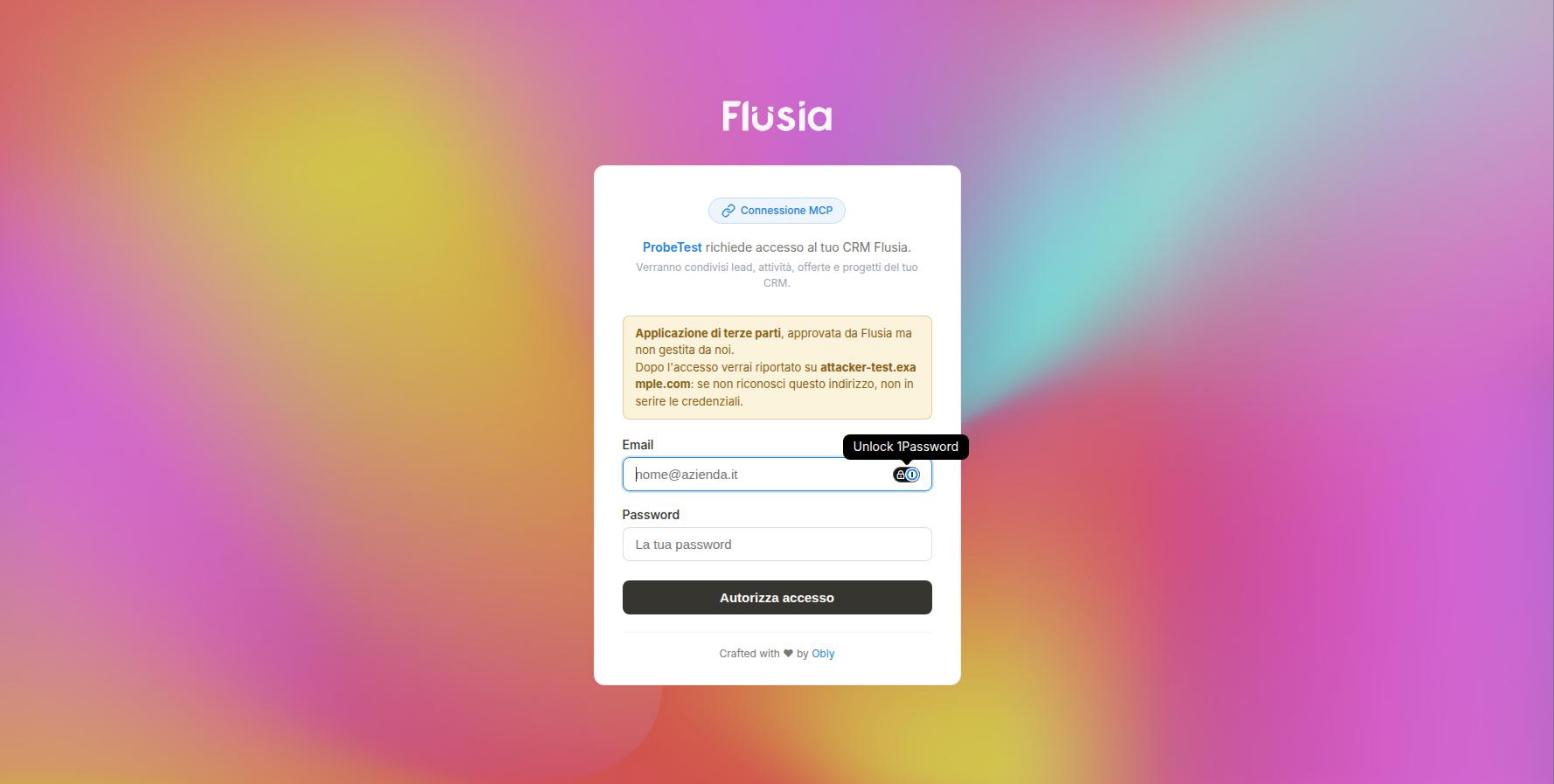
The consent page always says which app is asking for access and which site you will be taken back to after signing in. The box under the app name changes depending on who runs the app:
- Green box: the app belongs to a provider Flusia knows (for example claude.ai or chatgpt.com). After signing in you will be taken back to that site.
- Yellow warning "Third-party application": the app has been approved by Flusia but is not run by us. Check the site shown: if you do not recognize it, do not enter your credentials.
App pending approval
Which data is shared
The app receives an access token with the same permissions as your role in the CRM, limited to your company: Leads and Clients, Offers, Tasks, Projects and the other things your role can see or edit. The token lasts 30 days and the app can renew it by itself for at most 90 days from your consent; after that a new sign-in is needed. The requests you make to the AI app go through the app provider (for example Anthropic for Claude, OpenAI for ChatGPT).
How to revoke access
- In Flusia: Impostazioni > Informazioni Legali > App collegate, Scollega button next to the app: the app loses access immediately and to use it again you will have to authorize it once more.
- In the AI app: also remove the Flusia connector from the connectors settings.
- To block an app for all users, write to support@flusia.it: our team blocks it and cancels all the access already granted.
4. Everyday use
Guide to daily CRM usage.
4.1 Lead Management
View and manage potential clients along the stages of the pipeline.

Common Operations
- Create Lead: Click "+ New Lead" and fill in details (Type, Name, Source, Interest).
- Manage: Drag cards between columns. Use the menu (⋮) to add quick notes.
- Convert: open the lead and click "Converti a Cliente" when the sale is closed.
4.2 Client Management
All the information about a client in a single record.
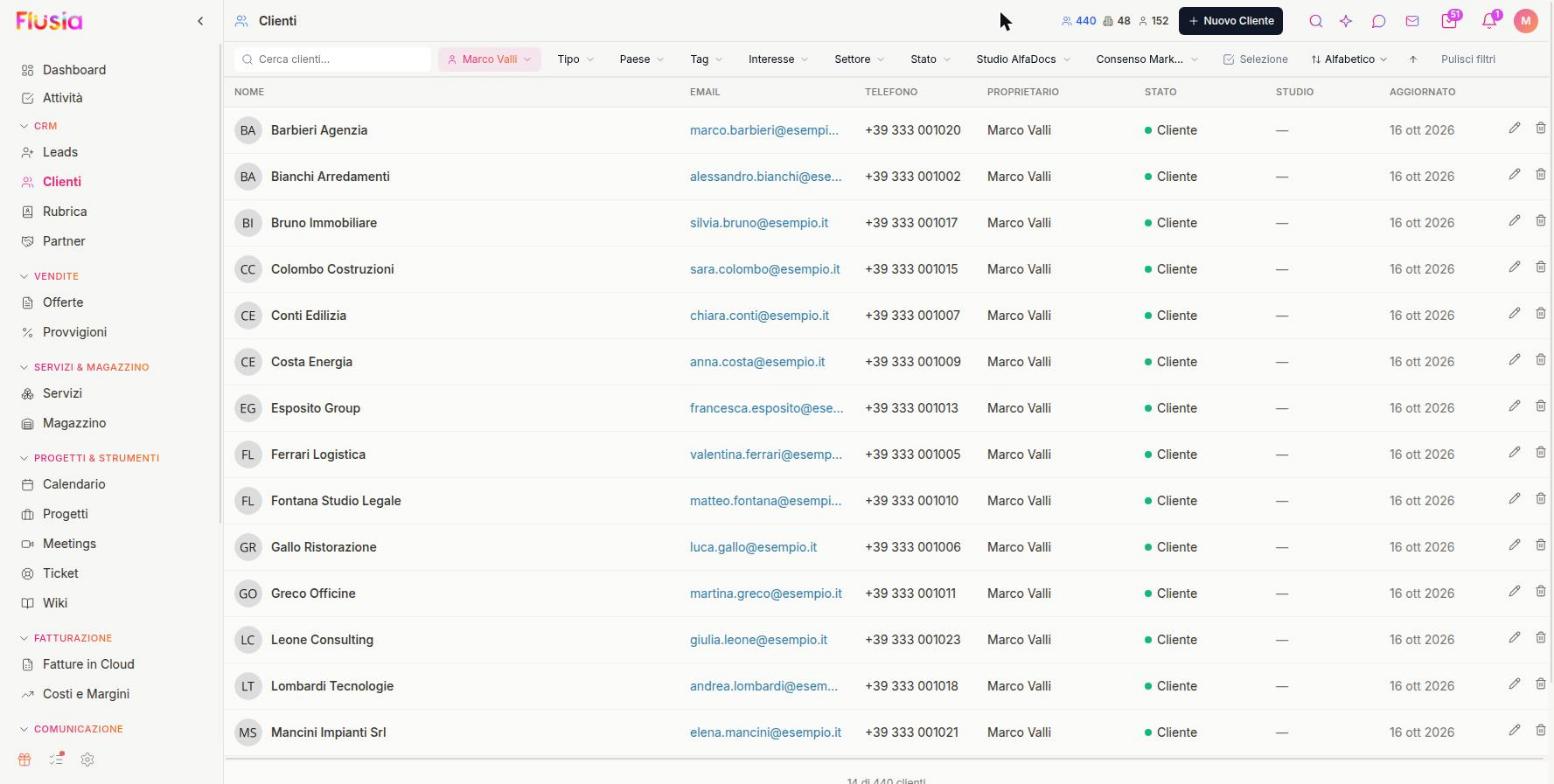

Select several clients at once to export their data, add tags or assign them to someone else in one go.
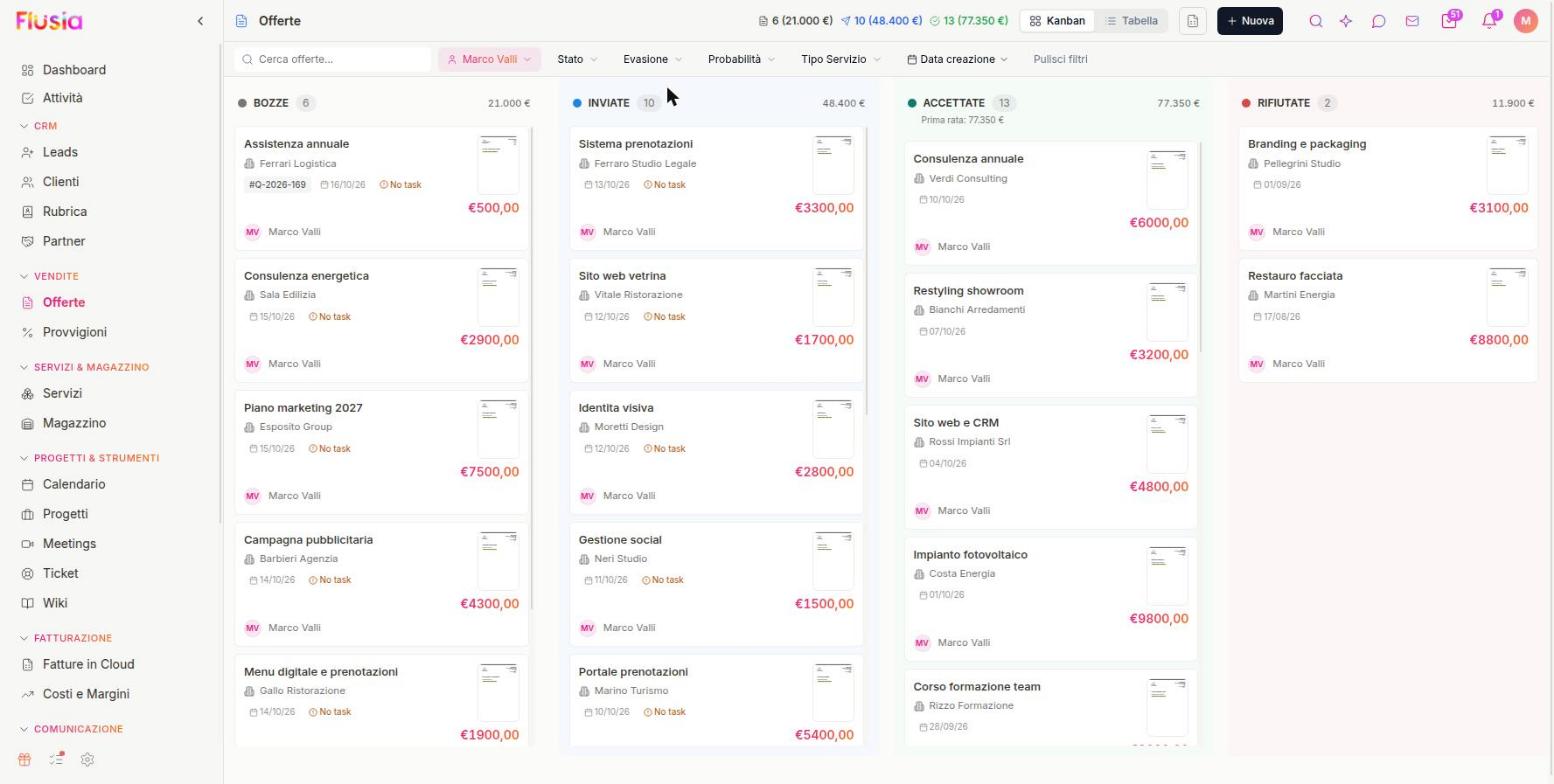
4.3 Offer Management
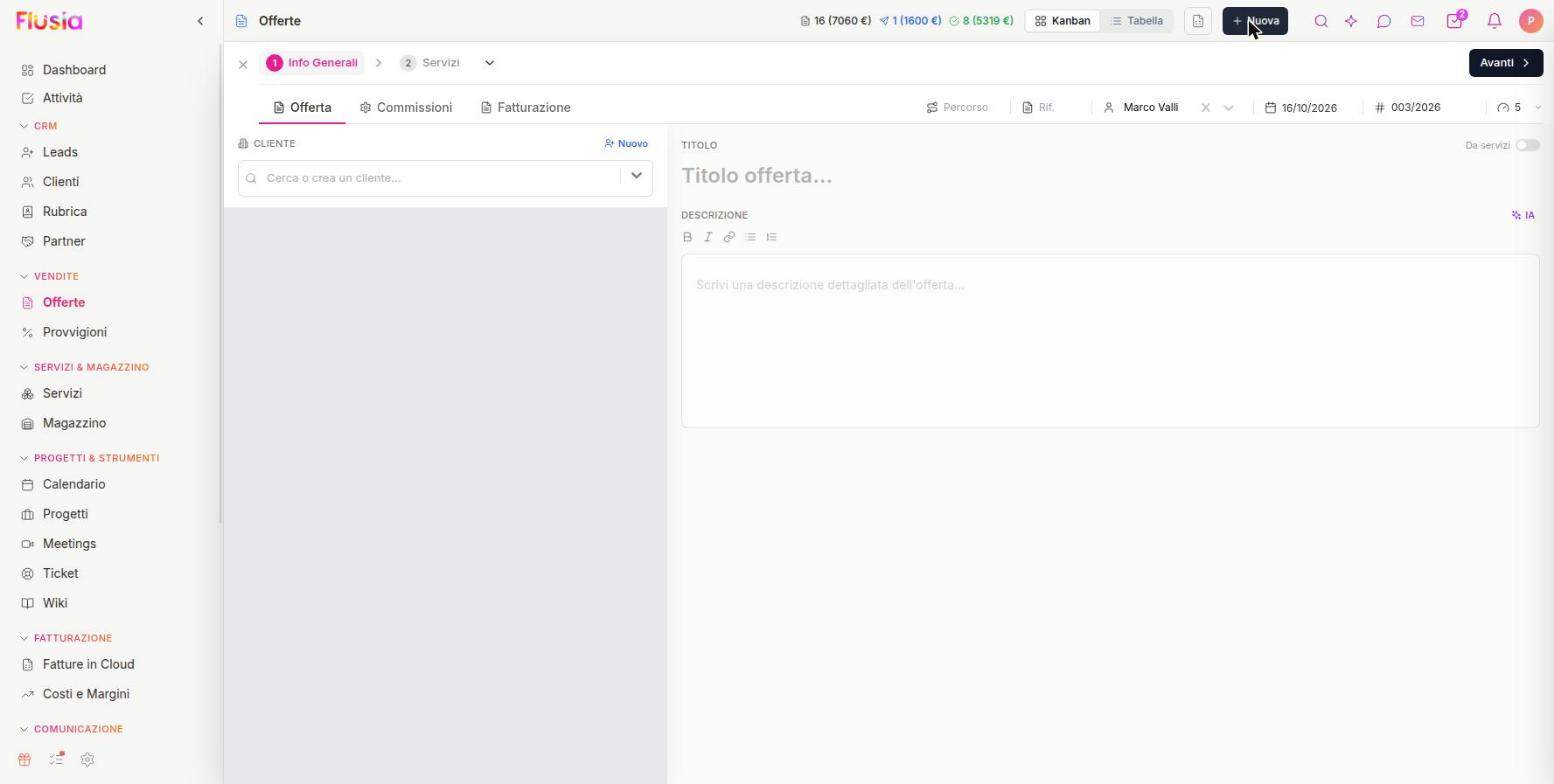
Creating an Offer in 2 steps
Deal States: DRAFT → SENT → ACCEPTED / REJECTED
From accepted Offers you can automatically create the Project or the Invoice with one click.
4.4 Project Management
Organize post-sale work.

- Project States: Planning, Active, On Hold, Completed.
- Tasks: create things to do with priorities and due dates and assign them to colleagues.
- Views: by client, Planning (week by week), Gantt (activities on a timeline) and Dashboard.
4.5 Invoicing
Invoice queue
Here you find all accepted Offers that have not been invoiced yet. You can prepare invoices one at a time or many together.
Connection with Fatture in Cloud
When the connection is active, sending to the Sistema di Interscambio (SDI) and numbering are handled by Fatture in Cloud.
4.6 WhatsApp chat
Integrated Messages panel, opened from the chat icon at the top right. It gathers WhatsApp, Instagram, Messenger and Team chat, and works like WhatsApp Web.
- Link to the client: each chat links itself to the CRM client if the number matches.
- Files: send images, PDF documents and Offers straight in the chat.
- History: all messages stay saved in the CRM.
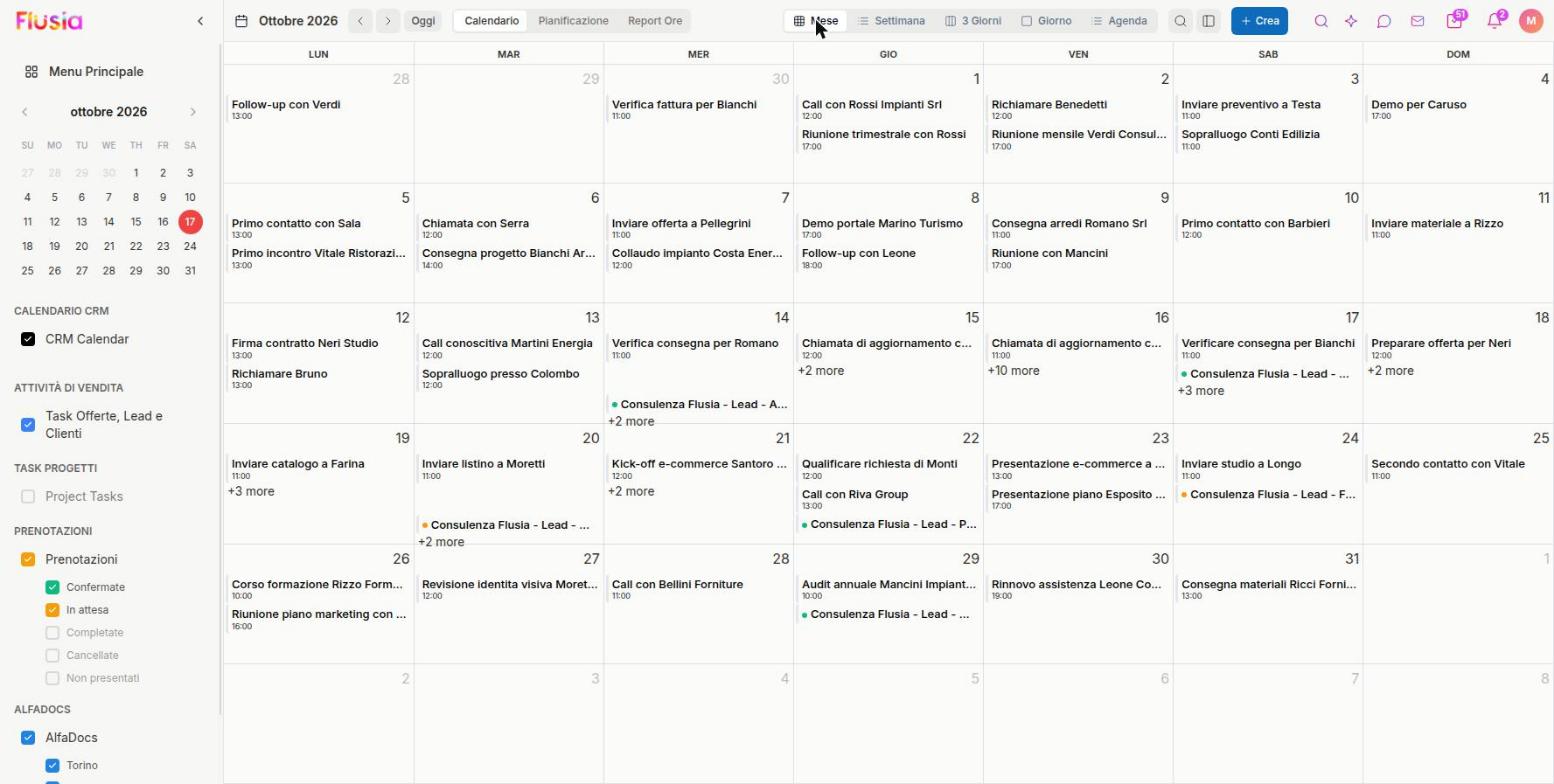
4.7 Calendar
Month, Week, 3 Days, Day and Agenda views to manage meetings, calls and tasks.
If you connect Google Calendar, events pass from Flusia to Google and back, and Google Meet links are created automatically.
4.8 Dashboard and reports
Keep an eye on your company's results, always up to date.
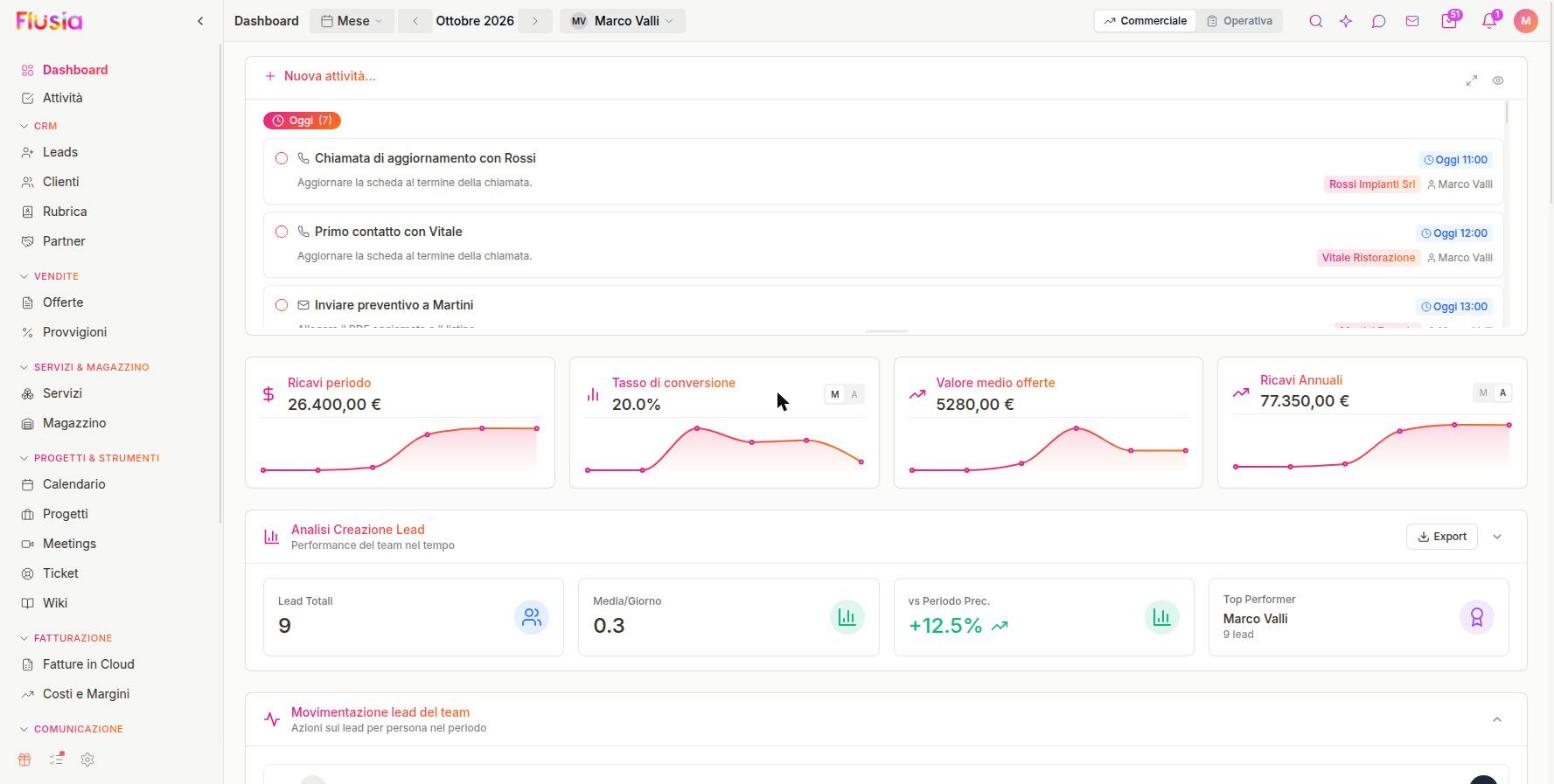
- Sales: the sales path, the share of sales closed (conversion rate) and the top performers of the team.
- Operations: tasks due soon, active Projects and workload.
4.9 Warehouse
Manage products, price lists and stock movements.

Product Management
- Go to Warehouse → Management Area → Products
- Click "+ New Product"
- Fill in: Name, Code, Category, Price, Stock
- Save
Categories
Organize products into categories. You can create subcategories for a more detailed structure.
Electronics
   - Smartphones
   - Tablets
Accessories
   - Cases
   - Chargers
Price Grid
The grid shows products in rows and prices by client type in columns. Click a cell to edit the price (auto-save).
Order Preparation
View orders to prepare, check off products as you prepare them, and mark orders as ready.
Zone Transfers
If the warehouse is divided into zones, you can move products by specifying source zone, destination, and quantity. Movement history is recorded automatically.
4.10 Partners & Referrers
Collaborate with businesses and reward those who bring you clients.
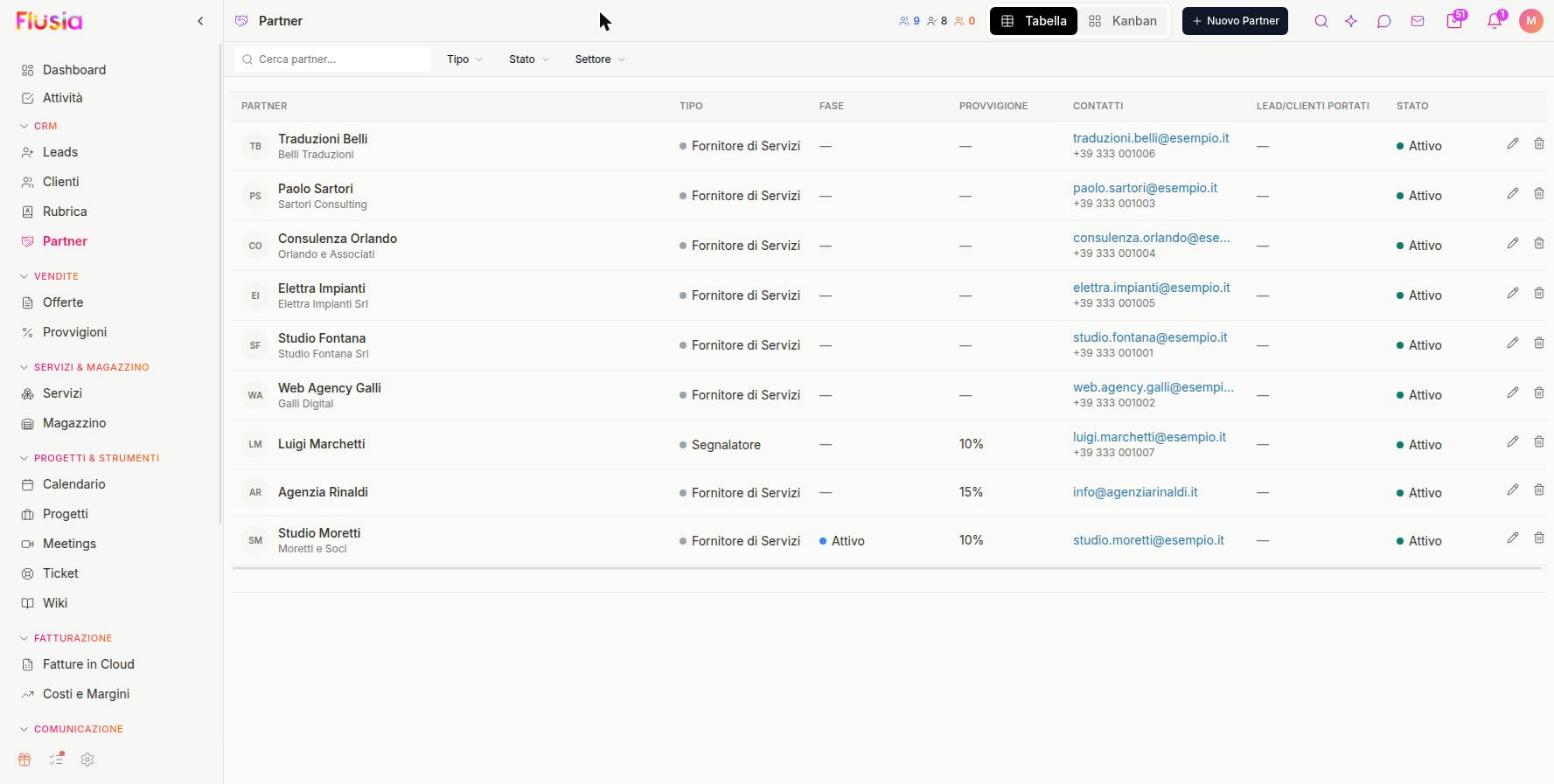
Partner Management
Partners are companies or professionals you collaborate with (resellers, consultants, affiliates).
- Click "+ New Partner"
- Fill in: Type, Name, Contacts, Partner Category
- Save
Referrers
Referrers are people who bring you new clients and receive a commission.
- Click "+ New Partner" and choose the type "Referrer"
- Enter: Name, Contacts, Commission (%)
- Optional: link the referrer to an existing Partner from the "Referrers to link to a partner" list
- Save
4.11 Newsletter & Campaigns
Send messages to many people at once, by email or WhatsApp.

Create a Campaign
- Click "+ New Campaign"
- Choose type: Email or WhatsApp
- Select recipients (all, with specific tag, manual selection)
- Create the content (use a ready-made template or write from scratch)
- Send now or schedule
Dynamic Fields
Personalize your messages with fields that fill themselves in:
{{nome}}{{azienda}}{{email}}Templates
Create reusable templates in Newsletter → Template.
Analytics
After sending, in the Analisi tab and in the campaign list you see: Sent, Delivered, Opened (email), Clicks, Errors.
4.12 Activities
All your activities in one place.
The "Attività" page has two tabs: Task operative (grouped by project, in List or Kanban view) and Task commerciali (things to do linked to Leads, Clients and Offers).
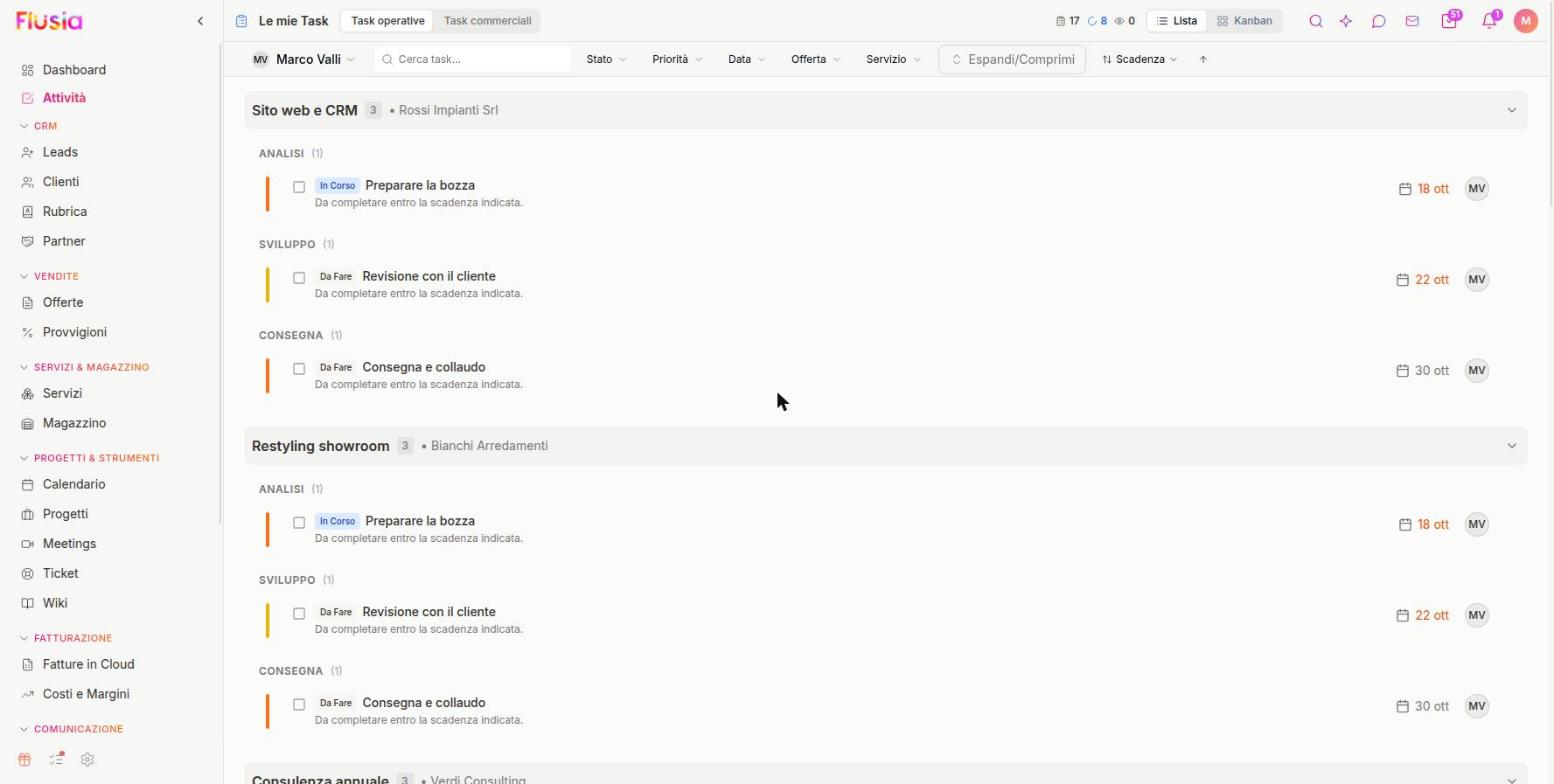

Creating an activity
From the Attività page, Task commerciali tab, "+ Nuova attività..."
"+" icon at the top of the bar → "Nuova Attività"
From a Lead, a Client or an Offer → "+ Attività"
Manage Activities
- Complete: click the box next to the title or "Completa"
- Edit: Click the title to open details
- Delete: Open and click "Delete"
Due Date Notifications
The system notifies you when an activity is about to expire or has expired (bell icon top right).
4.13 Support Tickets
Manage client support requests.
Create a Ticket
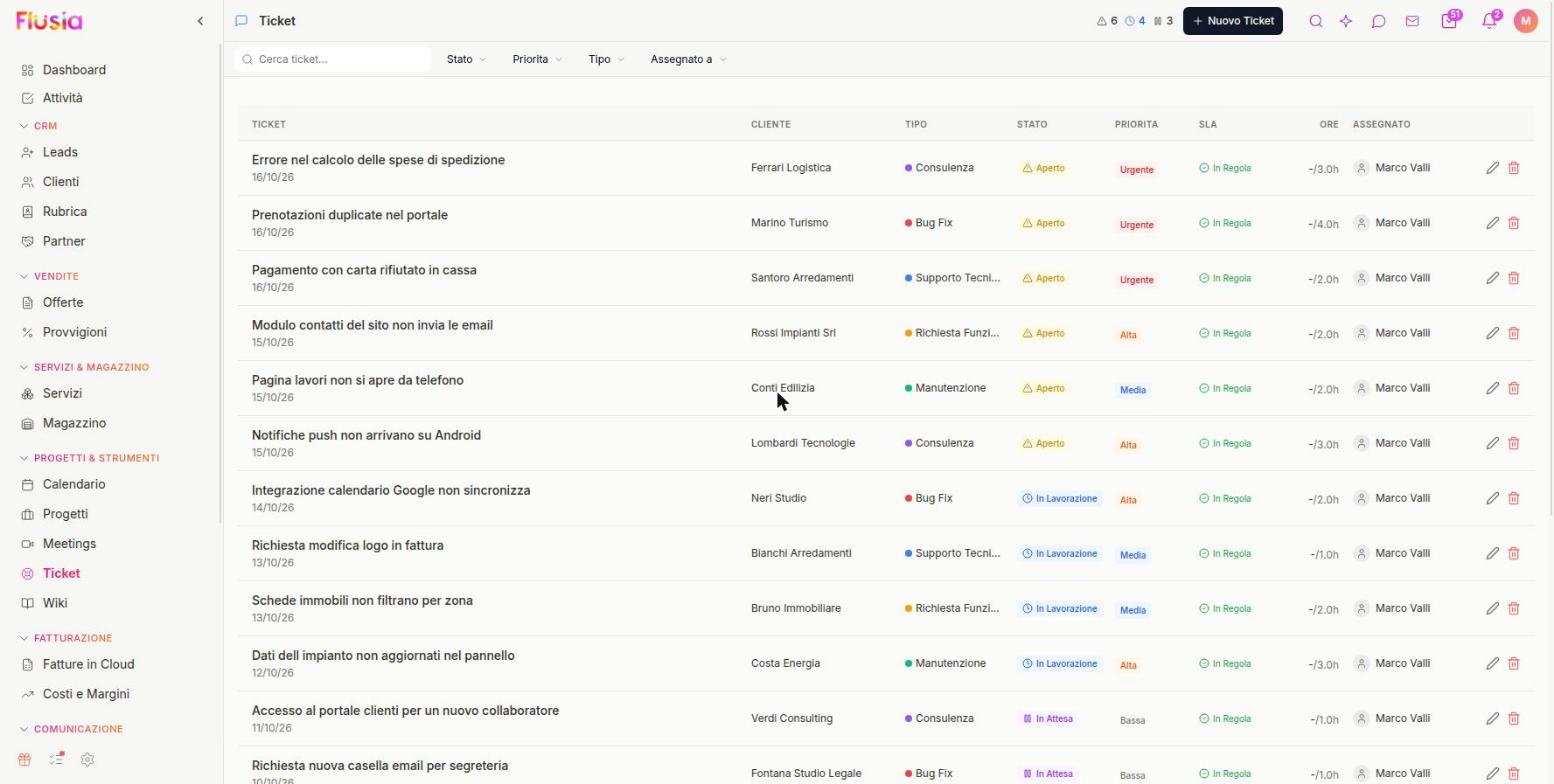
- Click "+ New Ticket"
- Select the Client
- Enter Subject and Description
- Set Priority and Assigned To
- Save
Ticket States
| Status | Meaning |
|---|---|
| Open | Ticket just created |
| In Progress | Someone is working on it |
| Waiting | Waiting for client response |
| Resolved | Problem solved |
| Closed | Ticket archived |
Manage a Ticket
- Click on ticket to open it
- Reply: Add comments
- Change Status: Update the status
- Reassign: Pass to another colleague
4.14 Documents & Email Signatures
Manage files and create professional signatures.
Document Management
You can save documents linked to clients, right in their page.
- Open the Client page
- Open the side panel on the right (folder icon)
- In the Documents section upload a file (PDF or image) or use Request to ask the client for a document, which they upload from the client portal. Uploaded documents stay in the page and can be opened or downloaded

Email Signature Generator
Create a professional signature for your emails.
- Click "+ Nuova Firma" and choose "Crea con generatore" (or "Carica HTML personalizzato" if you already have the signature code)
- Fill in Personal Info (name, email, phone, role) and Logo and Branding
- Choose Style and Colors
- In Anteprima e Download check the result, download or copy the signature and paste it into the settings of your email program

4.15 Flusia on your phone
Download the Flusia app or put it on your phone's home screen.


Without the app: home screen on iPhone
- Open Safari (required)
- Go to your CRM at app.flusia.it
- Tap the Share icon (square with arrow)
- Scroll and tap "Add to Home Screen"
- Confirm
Without the app: home screen on Android
- Open Chrome
- Go to your CRM
- Tap the three dots in the top right
- Tap "Install app"
- Confirm
What You Can Do from the App
4.16 First Login & Registration
How to register and access the CRM.
New Account Registration
If your company doesn't have a Flusia account yet:
- Go to app.flusia.it/register or click Get started free on the website
- Choose Sign up with Google or Microsoft, or enter your work email and accept the Terms and Privacy
- Enter the code you received by email
- Complete the guided steps (name, password, company)
- You enter the CRM with a 30-day trial, no credit card

Trial Period
30 days of trial with all features included. At the end, choose a plan to continue.
First Login (Invited User)
If you were invited by an administrator:
- Receive an email with access link
- Click the link
- Create your password
- Log in to the CRM
Daily Login
- Go to app.flusia.it
- Enter your email and click Next
- Enter your password and log in (if you turned on two-step verification you are also asked for the code)
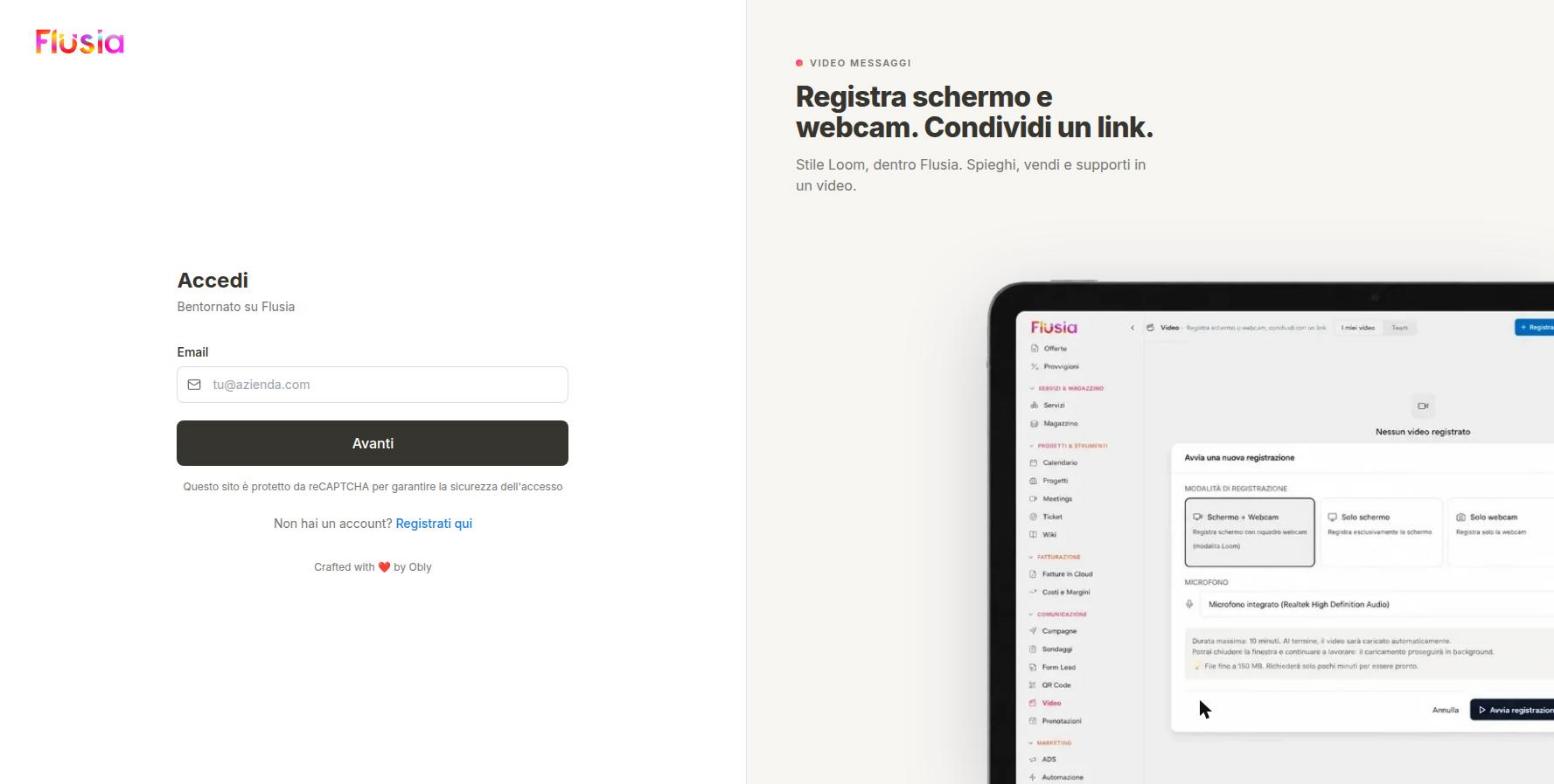
Forgot your password? Click the link on the sign-in screen.
4.17 Address Book
People and companies in a single list.
The Address Book gathers the people and companies you work with in one place. Each person can be linked to one or more companies, so you always know who the right contact is.
How it works
- Three tabs at the top: All, People and Companies.
- Search by name from the search bar.
- The columns show email, phone, main company, assignee, reference salesperson and status.
- A person can be linked to several companies with a role, for example owner, contact person or administration, and only one company is the main one.
Linking people and companies
- Open the company page.
- Go to the People section.
- Click New person to create one, or Link person to pick someone who is already there.
- Set the role, for example owner, contact person or administration, and whether the company is the main one.
4.18 Commissions
What each person is owed, calculated from accepted Quotes.
The Commissions page calculates commissions automatically from accepted Quotes and shows you, month by month, what each person is owed.
What you see
- The view is by month and, for each person (agent), lists the items by Quote.
- Each item shows client, service, type, amount, percentage, commission, payment received, payable commission and payment to the consultant.
- The tabs are Detail and Statements.
- The filters are Type, Payment and Person.
- The Recalculate and Export buttons refresh the figures and download the data.

How to set it up
Commission plans are set per user or per service. Once defined, the calculation starts by itself every time a Quote is accepted.
- Open Settings > Commissions.
- Create a plan for a user or a service and enter the percentage.
- Accept Quotes as usual: the items appear on their own in the Commissions page.
- Follow the status of each item: To collect, Collected, To pay.
- In Statements you find the summary per person; use Export to download it.
4.19 Bookings
Clients book an appointment on their own, through a link.
With Bookings you share a link: whoever opens it picks a day and time among the free ones. You no longer need to exchange messages to set an appointment.
The three sections
- Bookings: the list, with the filters Upcoming, Past and Cancelled. The statuses are Confirmed, Pending, Completed and Cancelled.
- Event types: each type has a duration, a colour and a public link to share.
- Availability: the weekly hours when booking is possible and the blocks for single days.

How to use it
- In Event types create a type, for example "30-minute call", with its duration.
- In Availability set the weekly hours and block the days you are away.
- Copy the public link of the event type and share it, for example in an email or on your website.
- When someone books, you receive the confirmation and the person who booked gets a reminder.
- The booking appears in the calendar and, if the person is not yet in your records, a Lead is created automatically.
4.20 Lead Forms & QR Codes
Collect contacts from your website and from printed material.
Lead Forms bring contacts straight into the CRM, while QR Codes connect the physical world to an online page that you stay in control of.
Lead Forms
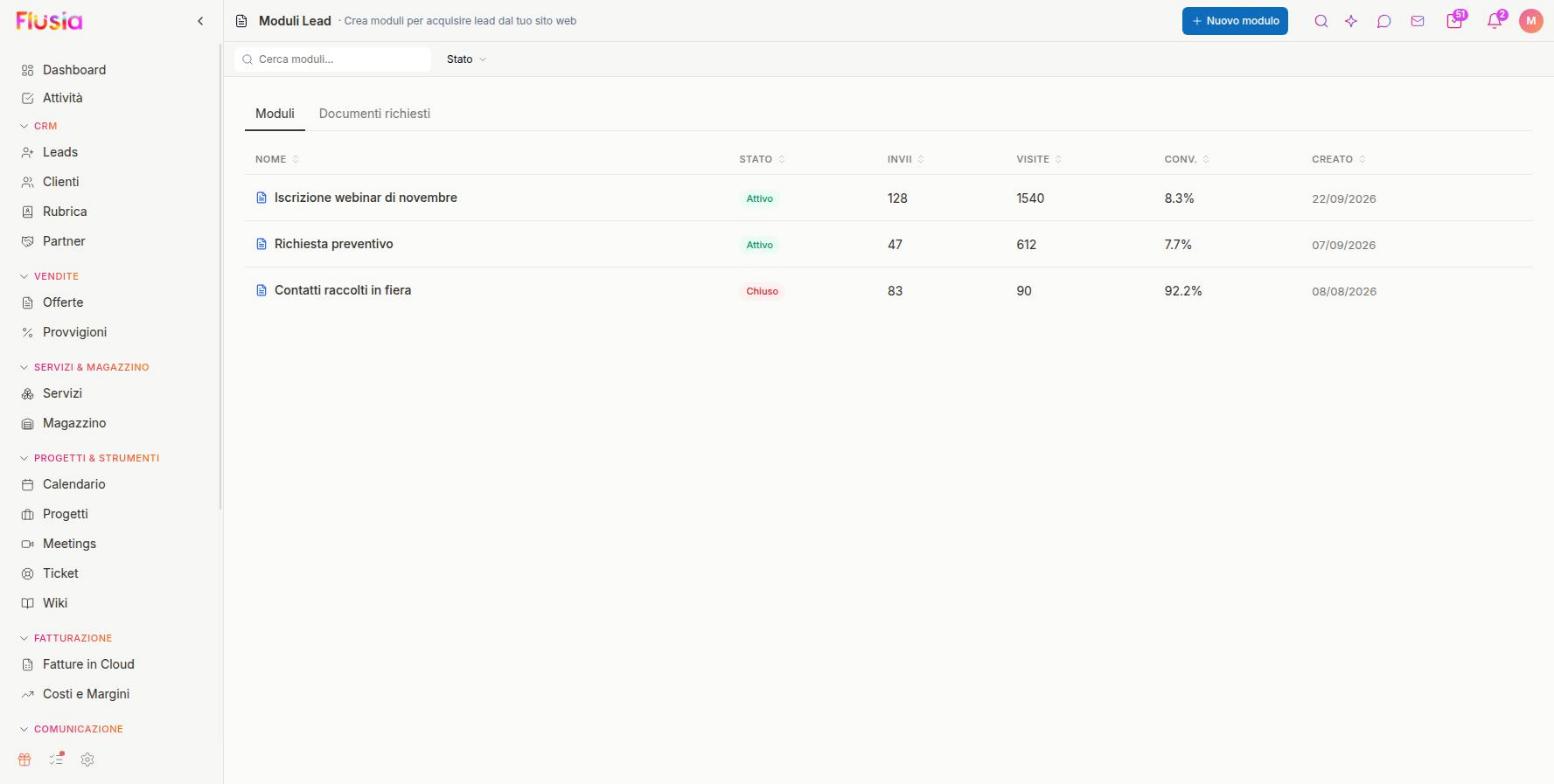
You create a form and either embed it in your website or share it with a link. When someone fills it in, a Lead is created in the CRM.
- The form fields are linked to the Lead fields, so data lands in the right place.
- Choose the pipeline the new Lead should enter.
- You can get a notification for every new submission.
- For each form you see Status (Active or Closed), Submissions, Visits and Conversion.
- Anti-spam protection blocks automatic submissions.
- The Required documents tab is used to ask clients for files.
QR Codes
QR Codes are dynamic: you can change the destination at any time without reprinting anything.
- Each QR Code has a name, a destination, the number of scans and a status (Active or Off).
- Scans are counted, so you can see what works.
- You can customise the style with your logo and colours.
- You create a new QR Code with the New QR code button.

4.21 Surveys
One question per screen, like a modern questionnaire.
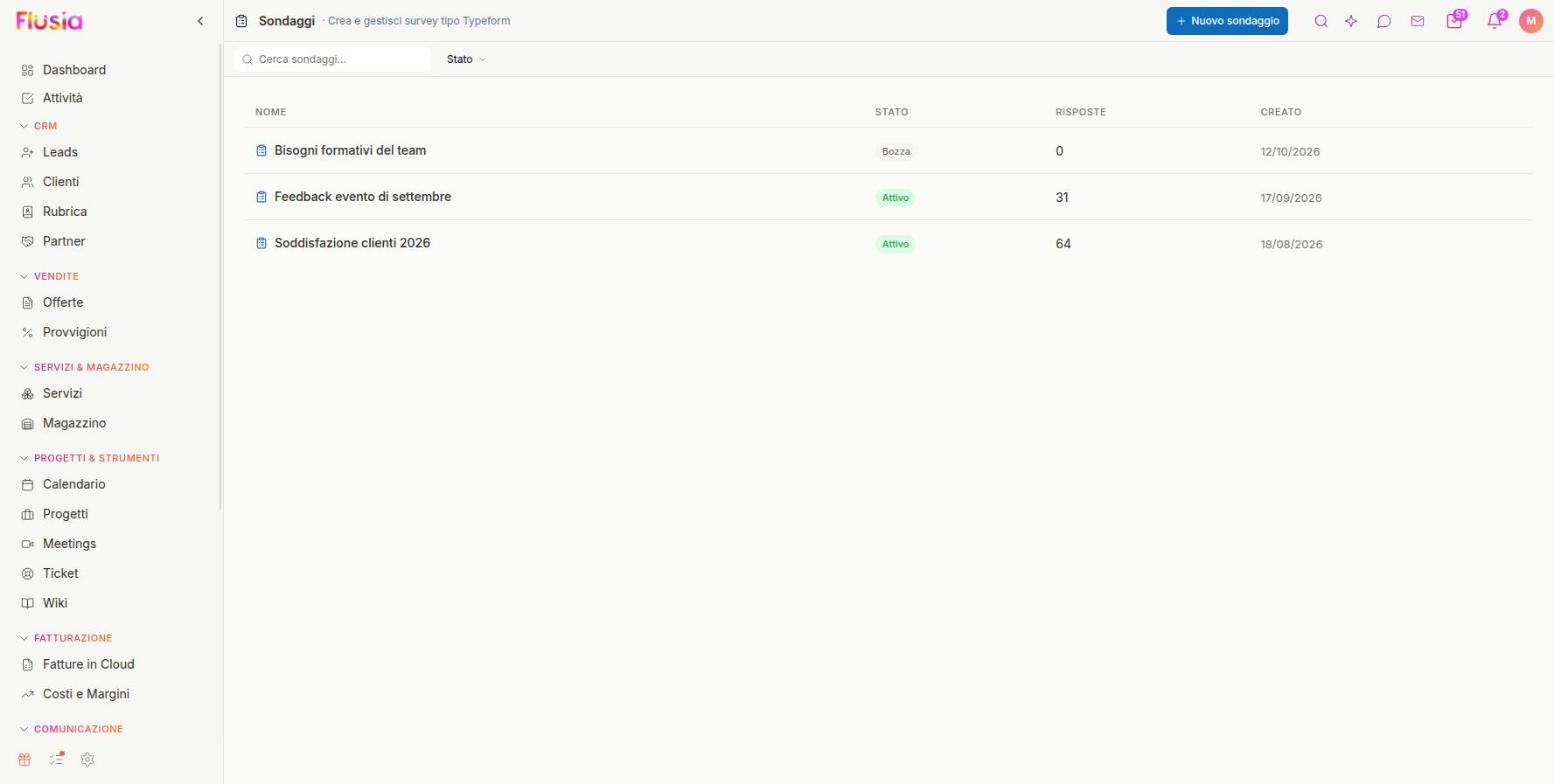
Surveys show one question per screen, easy to fill in even from a phone. Answers arrive in the CRM.
What you can do
- Questions of several types: text, multiple choice, scale, date and contact details.
- A welcome screen at the start and a thank-you screen at the end.
- A public link to share with whoever you want.
- Answers are collected in the CRM.
- You can save respondents as Leads.
- In the list you see the status (Draft or Active), the answers and the date.
How to create one
- Click New survey.
- Write the welcome screen and add the questions, choosing the answer type.
- Write the thank-you screen.
- Move the survey from Draft to Active.
- Copy the public link and share it; watch the answers as they come in.
4.22 Company Wiki
Your team's knowledge, in one place.
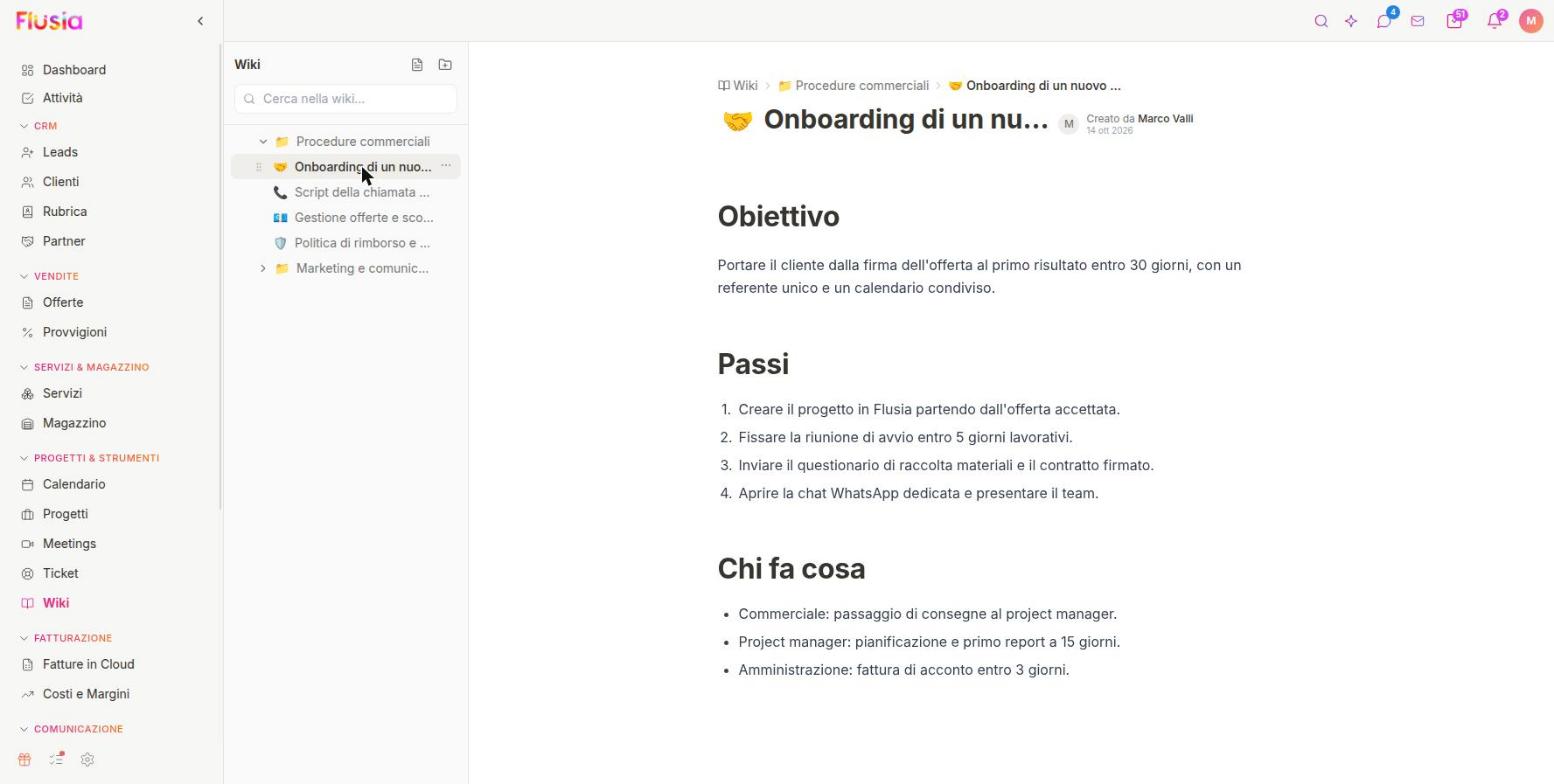
The Wiki is the company's internal knowledge base: folders and pages the team can read and update, without searching through files and chats.
How it is organised
- On the left the tree with folders and pages; each one can have an icon of your choice.
- On the right the page, written with a block editor: headings, lists, paragraphs.
- Search finds pages across the whole wiki.
- You can create a new page or a new folder at any time.
- Visibility permissions decide who can see each page.
Examples of use
- Procedures: how to prepare a Quote, how to open a Ticket.
- Call scripts for whoever contacts Leads.
- Guidelines: tone of voice, rules for prices and discounts.
- Instructions for newcomers to the team.
4.23 Costs & Margins
What each Quote really costs and what is left.
In Costs & Margins you record the costs linked to Quotes and services. This way you see the real margin and not just the selling price.
The page
- The tabs are Costs, Margins and Categories.
- The cost list shows Name, Category, Service, Client, Amount, Date and Status (Pending approval or Approved).
- The filters are Category, Status and Partner.
- You can choose the List or Grouped view.
- The New Cost button adds an item.

How to use it
- Create the cost categories in the Categories tab.
- Click New Cost and link the cost to a Quote or a service.
- A new cost stays Pending approval until the person in charge approves it.
- In the Margins tab you see the margin per Quote and per service.
- Costs from external partners can have a markup, so the margin takes that into account too.
4.24 AI Agents
Assistants that hold conversations for you, with rules you decide.
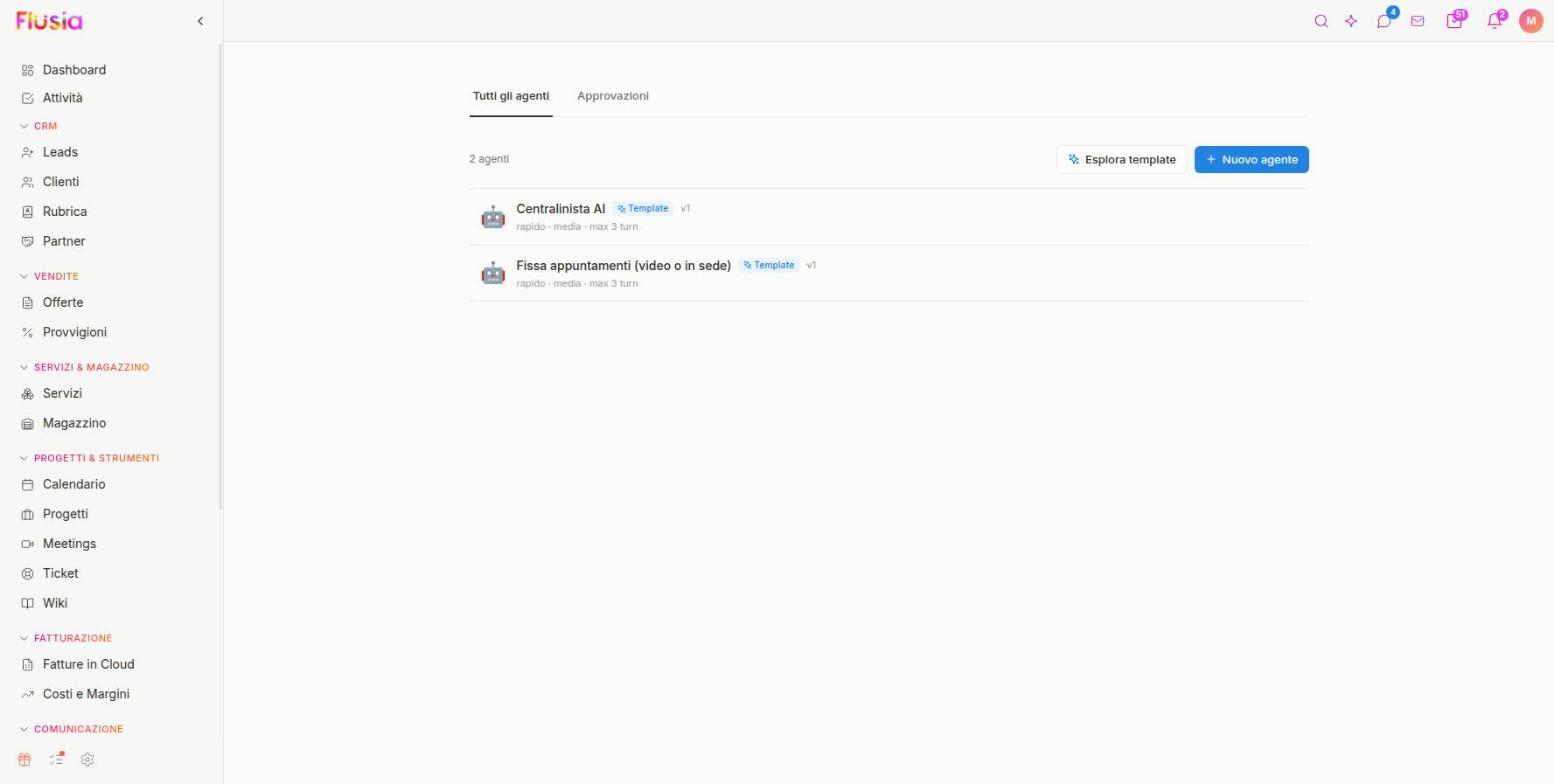
AI Agents are conversational assistants for WhatsApp and chat. They reply to clients following the instructions you give them.
What you find
- The list of agents, with name, AI model and turn limit.
- The Explore templates button to start from a ready-made model, for example a switchboard operator or an agent that books appointments.
- The New agent button to create one from scratch.
- The Approvals tab: an agent must be approved before it is published.
How to create an agent
- Click Explore templates and pick a model, or New agent to start from scratch.
- Write the instructions: what it should do, in what tone and what it must never say.
- Set the turn limit, meaning how many replies it can give before handing over to a person.
- Send the agent for approval and, once approved, publish it.
- Use it inside Automations and in chats.
4.25 Other tools
More Flusia features you will find in the menu.
Here you will find, in short, the tools that do not have a section of their own. For each one, I show where it opens in the menu.
Meetings
- Flusia records video meetings and calls: an assistant joins the video call and records everything.
- After the meeting you find the transcript and a ready-made summary, with no need to take notes by hand.
- Each recording stays linked to the client, so you can easily find what you said to each other.
- At the top you have the All, Meetings and Calls tabs to filter the list.
Video
- You record your screen and webcam straight from the CRM, up to 10 minutes.
- There are three modes: screen plus webcam, screen only, or webcam only.
- The video uploads by itself and you get a link to send to a client or a colleague.
- Useful to explain something, present an Offer or give support.
Gmail
- First connect Google from Impostazioni > Marketplace > Google Workspace.
- Then you read and reply to the emails in your mailbox without leaving the CRM.
- Conversations with a client also appear in their record.
ADS
- Connect your Meta and Google advertising accounts.
- See, campaign by campaign, how much you spent, how many contacts came in and what each contact costs.
- You also see which CRM leads come from which ad.
Lead enrichment
- Start from a few details about a lead.
- Flusia fills in the data by itself: website, industry, company size and tax data from the VAT number.
- The record fills up without you having to search by hand.
Team chat
- An internal chat between colleagues, inside Flusia.
- You do not have to leave the CRM to exchange a few words about work.
- Conversations stay close to the clients and Offers you are talking about.
Client portal
- Give the client access with a username and password.
- From the portal the client sees the shared projects and the status of tasks.
- They can upload the documents you ask for and leave comments.
Sales goals
- You set the goals for each month, per person or for the whole company.
- The Dashboard shows how much is left to reach them, the revenue of the period and the conversion rate.
5. Automations
Let Flusia do the things you repeat every day: when something happens, an action starts.

When this happens...
- Lead Created / Status Changed
- Deal Accepted / Signed
- Project Completed
- Task Overdue
- Tag Added to Client
Actions (...do this)
- Change status / Assign user
- Create activity / Note
- Send email / WhatsApp
- Send internal notification
- Wait / "If..." condition

Automation example
WhatsApp Automations
Use message templates to send automatic messages for: welcome to a Lead, Offer confirmation, payment reminder, birthday wishes.
6. Import and export data
Bring your data into Flusia or download it.
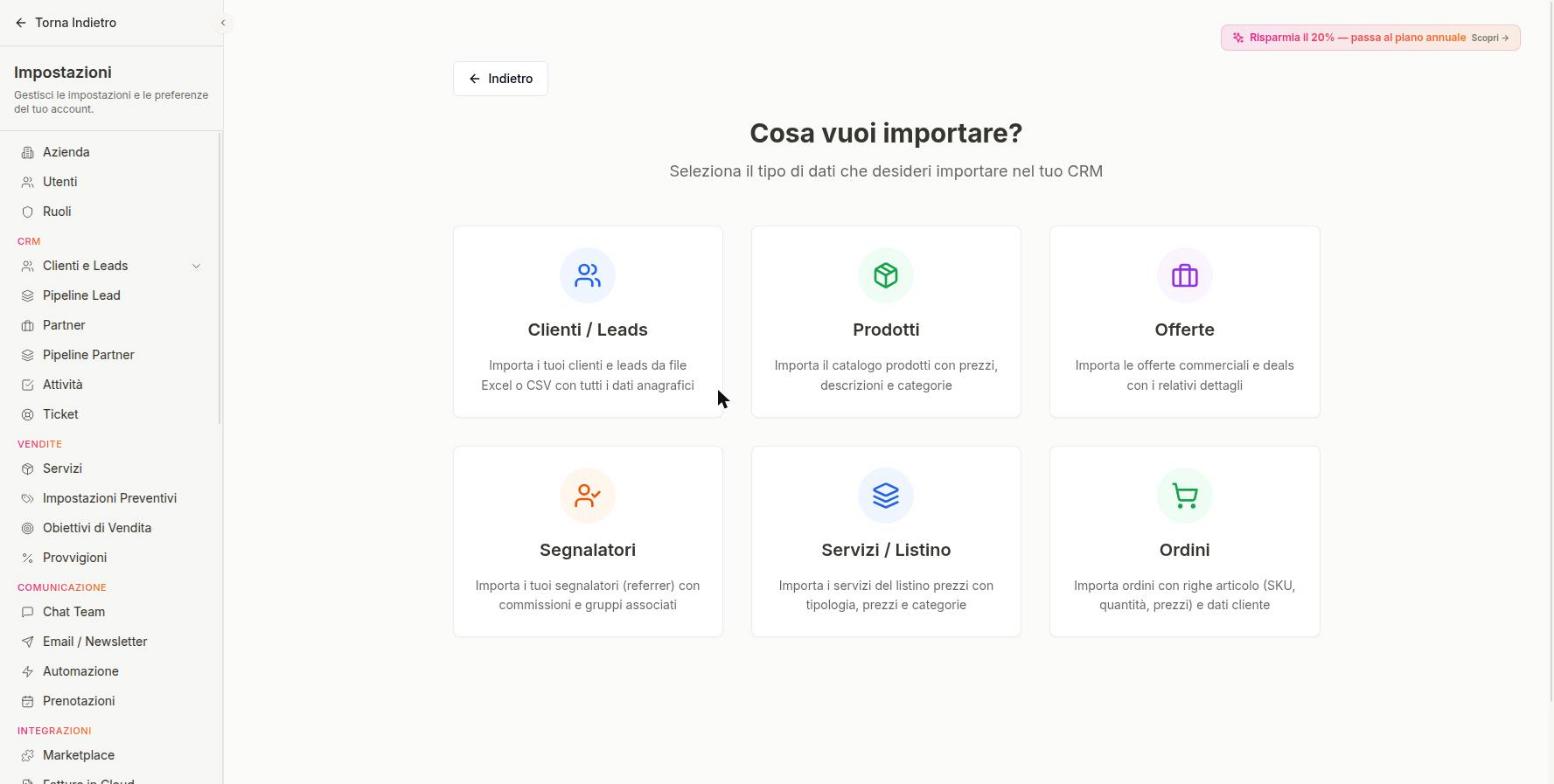
Bulk Import
- Prepare a CSV or Excel file with columns like: name, email, phone, vat_number, city.
- Open Settings > Import / Export, click Import and choose what to import: Clients / Leads, Products, Offers, Referrers, Services / Price list or Orders.
- For Clienti / Leads choose Esperienza guidata (in trial, with on-screen column selection) or Import classico, then upload the file.
- Match the columns: link the columns of your file to Flusia fields.
- Check the preview and start the import.
Data Export
- Click Export and choose what to download: Clients only, Leads only or Clients + Leads.
- Apply any filters (e.g., "Active Clients Only").
- Choose format (CSV or Excel) and download.
Switching from another program
If you have a lot of data: export from the old program, clean the data in Excel (remove duplicates), then import into Flusia.
7. Practical tips
Tips for getting the most out of the CRM.
For Sales Reps
- Tidy pipeline: update the status of your leads every day. Do not leave any standing still.
- Notes Everywhere: Document every call or meeting. "If it's not in the CRM, it didn't happen."
- Planning: before ending the day, prepare tomorrow's activities.
- Speed: an interested lead should be called back or quoted right away.
For team coordinators
- Key numbers: check the Dashboard every morning to see where work gets stuck.
- Simple stages: keep the pipeline clear (5-7 stages is ideal).
- Results: use the monthly reports to reward those doing well and help those struggling.
For Administrators
- Security: give each role only the permissions it really needs.
- Tidy data: now and then, check for and merge duplicate records.
- Automations: let Flusia handle repeated activities, so fewer mistakes are made.
8. Frequently asked questions
Answers to frequently asked questions.
I forgot my password.
What's the difference between Lead and Client?
How do I merge two duplicate clients?
Can I modify a deal that's already sent?
The Fatture in Cloud integration isn't working.
I can't see WhatsApp chats.
WooCommerce does not bring orders into Flusia.
Didn't find your answer?
Our support team is available Monday through Friday.